Algebra Balanced Scales
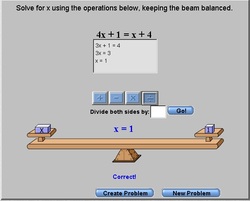
My Opinion: This is a great tool for students who struggle with the concept of solving for a variable when there are expressions on both sides of the equal symbol. Students can visualize why both sides of the equation need to be “balanced” and why when one operation is done to one side, it also must be done on the other side. However, I see this as a review tool, or for remediation purposes, when students are struggling with the concept. The student will need to understand the basic concepts of solving for the variable and to “undo” the equation until the variable is on it’s own.
Ease of Use: Using this simulation is very simple. It could be confusing, especially for the students who try not to read directions and want to dive in and try to figure things out without reading what is asked of them to do. I can image answering the same question on how to begin, over and over again for those types of students. Once students understand the empty box and clicking on the operations and numbers, the tool would be extremely helpful.
Educational Value: This is a very helpful tool in answering the “why” question in solving algebraic equations. Students can visualize the importance of keeping both sides of the equation equal.
Age appropriateness: This tool is appropriate for the middle school age, along with high school students who struggle. The student needs to be at the Algebra level to understand the process.
Classroom Use: I could the benefit of using this simulation as a whole class demonstration. Once demonstrated, giving the students the link to work on it on their own time, to practice if need be. I could also see having certain students use this tool when the class is broken up for individual differentiating practice needs.
Line Plotter
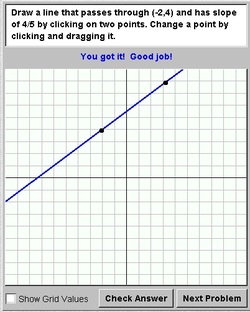
My Opinion: This simulation is very helpful in seeing how the slope works within a graph. Students can have unlimited practice problems to graph lines when given the slope and a point to use. Also, students have the ability to see that the slope can be found either left or right of the point, depending on how it fits on the graph provided.
Ease of Use: The tool is straightforward and easy to use. The information needed to graph, the point and slope, is part of the directions and so natural to read for both student and teacher. When students make a mistake, the program says so and gives the user more changes to fix the error(s).
Age Appropriateness: The program is appropriate for students at the middle and high school age. Age isn’t the issue as comprehension is. Students who are studying basic linear algebra, slopes and creating lines, would meet this criteria. Algebra is the correct level for using this simulation.
Classroom Use: I could see students working in pairs and exploring this simulation. This would be a great introduction to a unit, trying to have students figure out the process on their own. I could also see this simulation being helpful for review and remediation. This would not be as interesting as a class demonstration, as it is too basic for a class discussion. Giving the students a chance to explore and giving them the links to practice and explore on their own time would be a great tool for a linear unit in Algebra.

Two-Step Equation
My Opinion: I really like this simulation. This is a great way to give students options on solving a linear equation. Users are given 4 options in solving a 2-step equation. If the option the user picks is correct, the program gives a green light for being the correct option. Then students can see how the equation changes and 4 new options are presented for the next step in solving the equation. If a different option was chosen, the program explains how the option would work, but isn’t the best option to choose from. The program gives a yellow light and also shows how the option affects the equation. If the user chooses a wrong option, a red light is given and the user is asked to try again.
I like this simulation because students need to see that there isn’t only one correct way of solving problems. Students can see how some options are better than others, making solving easier or harder. I also like the simulation because it shows the equation and the process as the user chooses options. This way it matches the work that is done by hand as well. It is a closer connection to the work expected in assignments.
Ease of Use: This simulation is very easy to use. It is direct in what needs to be done in order to work the simulation. The program gives good explanations for each option presented so users can see the affects to the equation with each option. Students can redo or try again as needed.
Age Appropriate: This program would be great for any student working at the Algebra level of mathematics.
Classroom Use: The program would be great for individual practice time. I do not think it would work well as a class project or demonstration. The only reason to show to the entire class would be to explain how to use the program. This however, isn’t needed. Students would need to work individually to verify own comprehension. If this is a new concept, working in pairs may be helpful for the students who struggle. However, switching to individual usage would need to take place pretty quickly.
Algebra Tiles
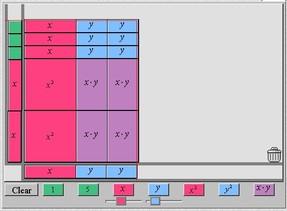
My Opinion: This simulation can be very interesting and helpful both for the individual student, group and class demonstration. There are several different activities that can be done using this simulation and the program provides many of the activities to try and play around with on the right side of the screen. This tool would be great! Many schools have the tile manipulation pieces, but using the tiles technologically instead of handheld allows for easier clean up, less storage to keep track of, and the ability to try other activities using the ideas of the program. Students can be self-starters by trying new activities while other students can stick with the same activity for review or better comprehension.
Ease of Use: It took me awhile to figure out the program. I kept waiting for something to tell me I’ve done the correct steps, never did the program tell me I was right. Since it is a tool that can be used in a variety of ways, there isn’t a “Good job! Correct Answer!” popping up on the screen. I had to do a little digging to figure out a couple ways of using this tool. I can see students getting easily distracted and off task since examples will need to be provided and the user doesn’t know if the problem is finished or not. If a student was struggling, they may have to ask for help to verify accuracy.
Age Appropriateness: This tool is appropriate to use in many different stages of education. As soon as students start learning 1’s, 10’s, and 100’s, this tool is helpful. Usually students have seen these tiles. This makes it easier to connect variables with numbers when students have used these manipulations.
Classroom Use: I can see this tool used as a class demonstration. Teaching factoring, and expanding quadratic equations, using area models fit right into using algebra tiles. This tool would also be helpful for extending lessons and giving students more of a challenge for those who need more material to stay engaged. Working together in pairs would allow students to work together, help each other and try new things. Seeing the simulation as a class before working individually or in groups would allow the teacher to explain how the program works. It would be a tool to have linked for students to find to help with homework and to try things on their own as well.
More links and information regarding graphing linear equations at the middle school level.
The Common Core Standards for Eighth grade students that this topic meets include:
These links provide great written explanations and videos that help students with assignments, reinforces a concept, and/or helps students who missed the lesson. Teachers can provide these links for students to search out on their own, when doing assignments, or as differentiated practice during class time.
The links provided are interactive programs that could be used as a class demonstration as new concepts are being introduced or in reviewing concepts before assessments. Interactive games, simulations, and worksheets that provide practice of linear equation and graphing skills:
Games and rewards students can play that reinforce the skills and concepts in a fun way. These would be fun rewards for students that have all assignments in, yet a review day for students that need more help and time to complete work.
Teacher resources for middle school math that includes the concepts for graphing linear equations. Other topics are included as well.
The Common Core Standards for Eighth grade students that this topic meets include:
- 8.EE.5. Graph proportional relationships, interpreting the unit rate as the slope of the graph. Compare two different proportional relationships represented in different ways. For example, compare a distance-time graph to a distance-time equation to determine which of two moving objects has greater speed.
- Connections: 8.F.2; 8.F.3; 6-8.RST.7
- 8.EE.6. Use similar triangles to explain why the slope m is the same between any two distinct points on a non-vertical line in the coordinate plane; derive the equation y = mx for a line through the origin and the equation y = mx + b for a line intercepting the vertical axis at b.
- Connections: 8.F.3; 8.G.4
- 8.EE.7. Solve linear equations in one variable.
- a. Give examples of linear equations in one variable with one solution, infinitely many solutions, or no solutions. Show which of these possibilities is the case by successively transforming the given equation into simpler forms, until an equivalent equation of the form x = a, a = a, or a = b results (where a and b are different numbers).
- b. Solve linear equations with rational number coefficients, including equations whose solutions require expanding expressions using the distributive property and collecting like terms.
- Connections: 8.F.3; 8.NS.1
- 8.F.2. Compare properties of two functions each represented in a different way (algebraically, graphically, numerically in tables, or by verbal descriptions). For example, given a linear function represented by a table of values and a linear function represented by an algebraic expression, determine which function has the greater rate of change.
- Connections: 8.EE.5; 8.F.2
- 8.F.3. Interpret the equation y = mx + b as defining a linear function, whose graph is a straight line; give examples of functions that are not linear. For example, the function A = s2 giving the area of a square as a function of its side length is not linear because its graph contains the points (1,1), (2,4) and (3,9), which are not on a straight line.
- Connections: 8.EE.5; 8.EE.7a
These links provide great written explanations and videos that help students with assignments, reinforces a concept, and/or helps students who missed the lesson. Teachers can provide these links for students to search out on their own, when doing assignments, or as differentiated practice during class time.
- Regentsprep -Colorful explanation with different forms of linear equations. The site includes links to using this concept in a graphing calculator.
- MathPlanet -Site includes pictures, written explanation and video on the topic of graphing linear equations.
- AlgebraLab -Written explanation with practice problems. Some words are links to glossary for better understanding if needed. Answers are given if needed.
- HotMath -Several problems to choose from, this site takes user step-by-step in solving a linear equation and graphing it.
- T-Charts -Written explanation on one way to graph linear equations, using points found plugging in different values for x.
- Slope-Intercepts -This written explanation looks at using slope and y-intercept to graph the linear equation. There are hints throughout the explanation.
- Slope of a Line -Video explaining how to find the slope of a line. Video through Khanacademy.
- Linear Relationships -Activity finding the linear relationship when one variable is given. Activity through Khanacademy.
The links provided are interactive programs that could be used as a class demonstration as new concepts are being introduced or in reviewing concepts before assessments. Interactive games, simulations, and worksheets that provide practice of linear equation and graphing skills:
- Mathwarehouse -An interactive program to see the shading on linear equations. User may move points around to see how the equation changes and the shading changes
- MathIsFun -Very similar to the other balancing scale. This scale has the user remove x’s and 1’s on own. The scale always stays balanced as the user sees that whatever operation is done, is done on both sides. Great interaction!
- Simple Coordinate Game -Great for reviewing how the Coordinate grid works and finding ordered pairs on the grid.
- Linear Inequalities -Activity looking at linear equations on a coordinate grid and the shading that is made through the inequality.
- Equation Solver -Activity showing the process of solving for a variable and showing the mathematical properties while solving.
Games and rewards students can play that reinforce the skills and concepts in a fun way. These would be fun rewards for students that have all assignments in, yet a review day for students that need more help and time to complete work.
- MathPlay -Game played by one or two players. Must get the answer correct to shoot baskets.
- Zogs -Game using linear equations to save an alien. Fun, and easy to use, once user understands what needs to be done.
- Algebra Four -This is a fun game for two to play! It has a timer, gives several different options of kinds of problems to use and then in order to add a chip, the problem must be answered correctly.
Teacher resources for middle school math that includes the concepts for graphing linear equations. Other topics are included as well.
- TheMathTeacher -Site made for math teachers. Site includes several different lesson plans, projects, webquests, worksheets on this topic and others. Geared for middle school.
- Teaching Ideas -This is a teacher resource site. Includes several different topics.
- World’s Largest Teaching Site -Includes links to lesson plans and ideas for teaching topics.
- MathVideos -Videos on teaching math topics and the sequence on topics
- Worksheets -Teacher Resource in quickly creating worksheets for students. Answer key included as well.
- TeachingChannel -Teacher Resource: Videos and ideas from teachers throughout the country.
